Feeds:
Posts
Comments

Archive for November, 2009

I thought the floors looked pretty good after sanding, but with the varnish on they looked even better. It’s vital to protect the floors, but also seemed to help bring out the colour.

Varnished floor

Varnished floor

I used Jenkins acrylic varnish in a Satin finish (satin is somewhere between gloss and matt, a pretty standard choice these days) which I ordered along with the sanding kit from Floor Sander Hire. I was warned off using a polyurethane varnish since it might discolour, and was also slower to dry. More info on why it might not be suitable, especially for pine floors, in this Wikipedia entry.

The first thing to do was clean the floors, mainly to get up the remaining dust from sanding. I hoovered and then wiped them down with a wet rag.

I then used a paint tray filled with the varnish, dipped a roller on a long arm into the varnish and then rolled it onto the floors. I worked up and down the boards, two boards at a time, backing myself towards the door so as not to end up marooned in the middle somewhere.

The mistake I made initially was worrying too much about how thickly I was putting it on. I kept trying to smooth out the bits which looked a bit white and gloopy, thinking it would dry that way, and ended up making it too thin. Doing it this way also took aaages, and I’ll probably need to add another layer at some point in the bedroom where it’s still too thin. My builder saw me doing this and put me right; it will dry clear, he said, so you can put it on a bit thicker than you might think and not worry about the odd white bits. He was quite right.

This varnish took about an hour to dry, though I left it overnight the first time. Three coats for heavy use areas, two for areas with less traffic, seems to be the consensus. Before putting down the final layer you need to go over the whole floor with fine (e.g. 120) sandpaper as the previous layers will have brought up the wood grain and it will feel quite rough. I don’t quite understand why this happens, but you really do need this final sand, it will feel much smoother after. You’ll feel it smooth out, it doesn’t take too long. I used a little electric hand sander for this, much easier.

That’s it! Doesn’t seem to be entirely scratch proof or anything like that, but is certainly preventing stains. As usual, please share your own tips in the comments.

(Previous post on sanding here).

Read Full Post »

Finished shelves

Finished shelves

Another long post, but I’d never done this before, so learnt loads and I hope these tips will be useful. I’d also like to reassure the shelving newbie that this really isn’t that hard, and can be done without fancy power tools apart from a decent drill (which everybody really ought to have, so useful). There may well be a better handtool for this than a hacksaw, but it worked great for me, and my bigger saw turned out to be useless so we made do.

So, if you’ve been following me on twitter then you may noticed my manic weekend of shelving, curtain rails and general DIY. Since my parents were up for a few days, I used the extra pairs of hands to help me put up some much needed shelving in the alcoves on either side of the living room fireplace. In usual Fixing It Up fashion, this was a slightly trial and error process.

Buying timber

First job was to measure the space and calculate the size of shelves needed. I did this on my own, which was a bit tricky, trying to both keep the measuring tape in line and balance a spirit level. I recommend getting some help with this. Unless your alcoves are miraculously straight, I suggest measuring the front and back of the space, and the top and the bottom. Fortunately mine were only a few millimetres out so I just went somewhere in the middle, thinking I could plane off any extra wood.

I went into Whitten Timber to have a look what wood would best match the floorboards and decor in the room. Their pineboard was both the cheapest and best option, given the size it needed to be. They cut the wood to the measurements I gave them and delivered the board, along with the lengths of wood for battening (the wood pieces that hold the shelves up). Great service. I also have all the offcuts, which I’m sure will come in handy.

Putting up the shelving

Here is our first finished shelf:

Completed shelf

Completed shelf; note 4 screws back, 2 each side and tapered edges on side battens.

We used battens on both sides AND at the back. For some situations this might not be necessary, but we knew that for the left alcove one side was going into plasterboard, so might not hold up too well. Plus, I was going to be putting heavy books and boxes on the shelves, and wanted to prevent them bowing in the middle over time.

Our process for each shelf was as follows:

1. PLANE THE BOARD

We discovered that one alcove had a slight bulge, which meant that the boards didn’t quite fit all the way in. We needed to lose some of the length off part of one end. I tried a rasping plane, a regular planer, sandpaper, files, but these were all useless against the grain of the pineboard ends. We were most successful just hacksawing it off and then smoothing with sandpaper.

2. CUT THE BATTENS

Cutting the battens

Cutting the battens

First we measured the back wall length and then cut a batten to that length (again, just using the hacksaw, very easy). We then laid that length against the shelving board, held the remaining batten wood against that and marked off the point where it came to the end of the shelf. Much easier than doing lots of measuring with the tape and introducing errors that way. At the cut point, I did a rough 45 degree cut backwards to get the tapered edge which looks better.

These back and side battens then became our reference for marking up battens for the rest of the shelves, and I was able to fairly quickly prepare the rest of the required pieces (more hacksaw!). My 45 degree cutting was mostly by eye, but it looks absolutely fine.

3. DRILL HOLES IN BATTENS

Drilling the batten holes

Drilling the batten holes

We figured that two holes on each side, and four on the back would be plenty. We’d taken advice at the DIY shop that 2inch screws would be fine. And that we could use a 5mm wood drillbit for this. We marked up the reference battens at even points, making sure the back one had two screws fairly close to the end, and then drilled through. Now, I don’t have a proper work bench, so we were a bit makeshift, using the offcuts to create a platform for drilling into. But it was safe, didn’t move about, and prevented damage to the floor.

We then used the hole positions in the reference battens to mark up the rest, and drilled all of those.

The next step is to use a countersink so that the screw head doesn’t stick out from the wood. There is a neat video about how to do this here. It’s pretty straightforward. Again, our slightly amateur trial and error efforts meant our countersinking was fairly uneven, but it looks absolutely fine so don’t worry too much about getting this perfect (life is short, you know).

4. PUT UP THE SHELVES

Marking up drill holes for back batten

Marking up drill holes for back batten. Newspaper is our feeble attempt to prevent brick dust getting on painted mouldings.

Here’s what we did. First we put the back batten against the wall where I wanted the bottom shelf to be, and put a spirit level on top to keep it straight. When it was in the right place, we poked through the ready drilled holes with a bradawl and made as big a hole as possible to mark the right position and also provide a guide hole for the drill.

Then, removing the batten, we used a 6mm masonry drill bit and drilled the holes in the wall, using the hammer function on the drill. Take care here not to drill too far into the wall, it only needs to go just far enough to fit the rawlplug in. Then push raw plugs at the correct size (they are clearly marked) for the screws you are using into each hole.

Put the batten back in place, and screw through the holes into the rawlplugs until nice and tight. First batten done!

Back batten fixed, holes and plugs ready for side batten

Back batten fixed, holes and plugs ready for side batten

We then put each side batten up against the back batten, using the spirit level again, and marked out the holes for these in the same way, repeating the whole process until we had all battens in place. Then we just popped the shelf on top. Success!

One exception – when we were drilling into plasterboard on one side. Then you may need to use special plasterboard plugs which butterfly out after being pushed through and secure themselves behind the board. This seems to hold pretty well.

Then it’s basically repeat process until you run out of room, or ladder. Nothing quite so satisfying as being able to finally unpack your books, believe me.

Update: my dad says I should point out how useless my original cheapish drill bits were. We had to go out and buy some decent ones, which made all the difference.

Read Full Post »

Some of the tips/thoughts that have appeared on my Twitter feed.

  • Trying DIYtools.co.uk, rather than usual Screwfix: they were cheaper and had more stock. Plus 5% off with code diytools5 http://bit.ly/k8QHr
  • Ooh, just found these cute little kitchen compost buckets from Garden Trading http://bit.ly/19axZp. But which colour? hmmm
  • Catching up with old Observer mag with series of How to (put up shelves, maintain appliances etc) articles http://bit.ly/hhNAW
  • Ah, I see, are extracts from Mend it! by Sian Berry http://bit.ly/kar8f Doesn’t look like it’s actually out yet.
  • Just ordered loads of pineboard direct from timber merchants for shelving. I really REALLY hope I calculated cuts etc correctly, eek.
  • Timber arrived. Fits fine, maybe a weeny bit of planing needed on one side. Phew. From Whitten timber http://bit.ly/ym3rZ Good service.
  • http://twitpic.com/l00zq – First shelf up! So pleased. Despite comedy of errors we are learning quickly
  • Curtain rails up; not too difficult given the height. Fridge/freezer door reversed; absolute pain, thanks Indesit 😦
  • RT @JanetStrath: Some dodgy DIY for the weekend: http://thereifixedit.com/
  • http://twitpic.com/m9sla – Lovely wooden wormery, £10 from Southwark council (if you are a resident).
  • http://twitpic.com/m9spy – And now with happy worms! Not allowed food for a week though apparently. Seems harsh.

Read Full Post »

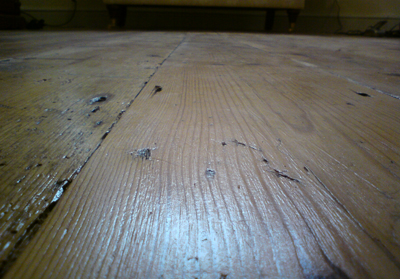
Close up on the living room floor

Close up on the living room floor

There are many ‘how to sand’ articles and videos around on the web which are great on the ‘best case scenario’ version of this process. However, this wasn’t enough for my tricky old floorboards, warped and full of nails and screws, so I’m hoping that others in the same situation will find my experience useful.

My first tip: don’t leave yourself only three days to do the sanding and varnishing before you have to move in if you have three rooms to complete. It is REALLY hard work, and even quick drying varnishes take up time. I only just made it, and that’s with my builder helping out.

Before sanding

When I pulled up the carpet in the flat, some very dirty floorboards were revealed, with ugly cuts created when work had been done around the radiator and so on.
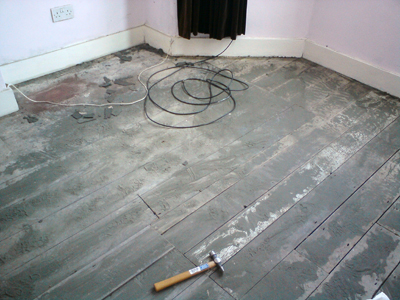
Living room before sanding

This is the living room floor before sanding. Note the cuts and edges all lined up
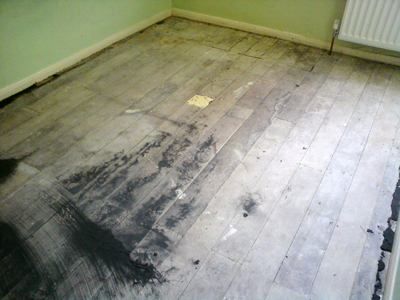
Bedroom before sanding

This is the bedroom before sanding, more cuts near the far wall.

My builder suggested that he pull up the boards and rearrange them, moving the edges out of line with each other and therefore lessening their impact. This has made a BIG difference, most of those cuts are barely noticeable now. The only slight problem was that he had to use some of the boards from the hallway as replacements, and then replace those with new board. I haven’t finished the hall floors yet, so I’m not sure how that’s going to look when finished.

Preparing the boards

Everything you read about sanding online (e.g. http://www.floorsanderhire.com/process.php) will tell you that preparing the floorboards is hugely important. This isn’t the whole story, as I’ll explain, but is indeed a massively important step. The main thing is to countersink any nails, screws or other mystery metal pieces (I had a lot of these) through the board below the surface level. Otherwise you will destroy the sander belts when they run over spiky objects. This will quickly prove very expensive, and very tedious.

I used a club hammer and a nail punch, but my inexperience and fear of slamming the hammer into my hand was a bit of an issue here. There were many remaining nails that I just couldn’t get to shift, but which my builder had no problem with. It just needed a lot more welly than I could give it, disappointingly. Might be worth getting someone totally fearless and very strong to help out here!

If you have loads of nails and screws and very dirty boards, as I did, you may still miss some metal bits during this process. My builder had a handy tip to solve this, using the sander, which I’ll share in a moment.

Hiring a sander

I used Floor Sander Hire, in London. Their prices seemed reasonable, and from what I can tell they had some really good kit. I asked for their advice about which package I should get over the phone, and I went for the one with the upright continuous belt sander (or drum sander), edge sander, and a corner sander, and with a full range of belts. This turned out to be perfect for my needs – no stairs, but lots of corners! They also sold me the satin varnish, which was very handy.

They turned up at the right time to deliver the kit and varnish, gave me a full demo, and picked the kit up when they said they would, so I have absolutely no complaints with their service. The kit itself wasn’t too difficult to use, and the bags were good for collecting dust. In particular, the upright belt sander had a sort of clutch which lifted the belt at the end of each run, a really useful feature.

The sanding process

The classic instructions for this are something like those on the Floor Sander Hire website:

“Use a coarse p24 sanding belt to level and clean the floor boards then use a p40 and p80 medium sanding belt afterwards to smooth floor. (If you are not filling gaps, proceed with p120 sanding).”

Other sites and books I’d read suggested going diagonally across the room first, using the p24 sanding belt, to level the boards, and then up and down with the medium and then fine paper.

I started this way, but I soon hit nails that I hadn’t spotted before, and wrecked my first belt. Seeing this, my builder showed me a trick. Taking the upright belt sander, he loosely and quickly swept it over the whole floor, trying not to press down hard. Sort of like doing a super quick hoovering job. The belt caught the tops of the nails and varnished them, exposing the bright metal. After doing this, I could suddenly see all the nails that had been invisible before, and went around once more banging them all in. You don’t have to go too crazy with this, by the way, the metal just has to be a little under the surface.

Now I could start properly. The bedroom wasn’t too bad, didn’t need much levelling, and I did this in the suggested way. In some places the dust was ingrained in dips and dents, and I used the corner sander here as it has a narrow belt that can work into cracks. The bedroom, which appears to be a newer reddish pine, came up like this:
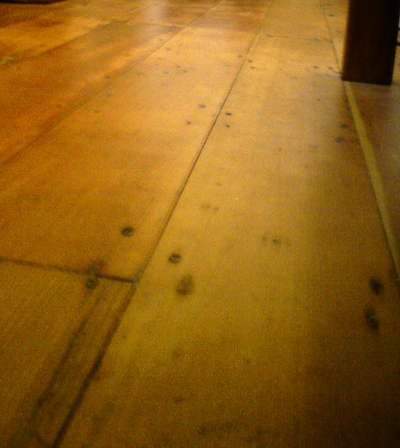
Close up on the bedroom floor, sanded and varnished

Close up on the bedroom floor, sanded and varnished

The living room was a different story, though. The original boards were still in place, but over time they had raised up at the edges. This left them dipped in the middle and requiring much more diagonal levelling with the coarse paper, before you could even get the sander to hit the middle when using it lengthways.
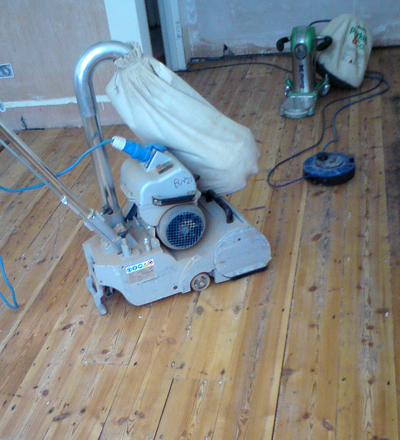
Belt sander and edge sander

Belt sander and edge sander. Nearly there with the floors but still more work to do.

Unfortunately, it was hard to prevent the sander from scoring the wood in some places, especially where the floor itself rose by a few inches. The good news is that it really doesn’t look too bad after varnishing, the scoring is evened out in colour and hardly notices. Again, the corner sander was useful for digging out damaged and dented bits. The finished boards look like this, imperfect but full of character. I love the way this looks.
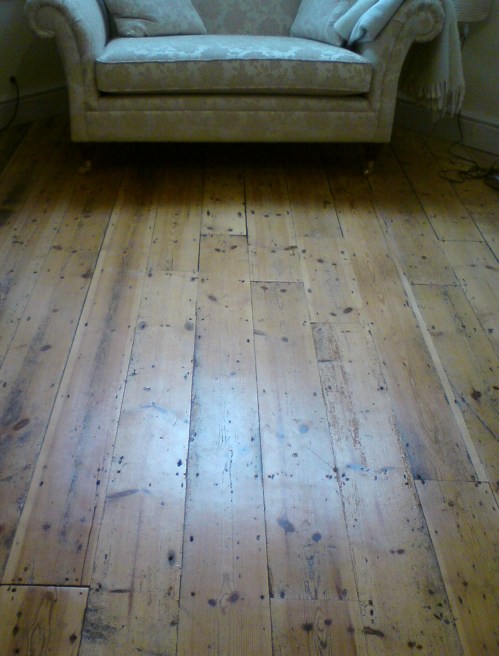
Finished floors in the living room

The living room, sanded and varnished.

The hallway was too narrow for the belt/drum sander, so we used the edger for the whole thing and I had to accept that it was going to be less than perfect. The edger worked well enough, though it hasn’t really levelled it. I don’t think it matters that much, really.

I did no gap filling, by the way, I didn’t think it was necessary, and I had neither the time or the inclination. Next I had to varnish the floors, but I’ll leave that for another post, I think this one is long enough!

Other tips:

Using the sanders with bags worked really well for keeping the dust down, making some of the advice you see about painting before sanding to avoid painting over dust stuck to the wall rather redundant.

You really have to keep the sander moving, the edge sander in particular is really fierce and will score or burn the wood if you leave it in one place for even a short while. It’s nearly impossible to get rid of this scoring once it happens. As mentioned, though, the varnish helps a lot so don’t panic if you do leave a mark.

Mind the pipework! The edge sander can go right through a radiator pipe, so steer clear and use the corner sander carefully around these bits.

I think that’s it, please share any tips of your own in the comments.

UPDATE: Post on varnishing the floors is now here.

Read Full Post »