Feeds:
Posts
Comments

Posts Tagged ‘paint’

I am now *this* close to being finished, just waiting for a dry enough stretch for the builder to come finish the front of the house and tidy up some minor items on the snagging list. Since the last post the bathroom is done, the living room has been repainted (um, again, I changed my mind about the colour) and a fireplace installed along with two gorgeous rescue cats (PS the Celia Hammond Animal Trust could do with more good homes for their cats, go check them out).

Over the last year and a half there have been lots of big learning experiences (see posts on floor sanding and tile painting) and many more little ones. I’m collecting some of the little ones in these posts.

  • Black floor tiles show up the dirt probably as much as white ones would. Got matte black tiles from B&Q for the kitchen, they look great when clean, but are mostly covered in little paw prints now and are quite hard to get looking really good again. Even when I do it’s fairly fleeting as more dirt is tracked in. I have settled for regular sweeping and less than perfection.
  • Neutral colours on a oddly shaped room make it look untidy. I couldn’t make a decision when I first had the living room done so opted for whites and creams. It’s a tall room with a big bay window, fireplace and alcoves and a funny little cut out bit for the door and hallway. It’s a bit awkwardly shaped, really, and the whites just emphasised this and drew the eye to the clutter of the bookshelves and so on. I decided it needed to be brought back together and found a series of warm greens from Dulux, lighter above the dado rail and darker below. MUCH better. My mother commented that before it felt like the room was flying apart and now it’s coming together, which sums it up for me. I will post some pics later, I promise.
  • Test wood stains/beeswax on a small area, really. I hate my bedroom door. I have new pine doors throughout the house which need treatment. Beeswax with a tint was recommended, and I went for “antique pine” to match floorboards. I thought it was going on a bit dark and oddly coloured, but persevered as I thought maybe it would look better when all covered. Er, no. Looks rubbish. It doesn’t help that I put it on too thick and didn’t scrub it in with wire wool enough, but even after a thorough going over it is still the wrong colour. May have a go at sanding it back some day, but I’m stuck with it for the meantime. Probably gonna go with plain beeswax or paint, and maybe get someone else to do it because it’s a right pain, I can tell you.

Read Full Post »

Two finished bathroom tiles with sea creature designs

Two of the finished hand-painted bathroom tiles

When I started trying to work out what I wanted for tiles in the bathroom, I realised (again) that trying to source something distinctive and pretty could work out very expensive. My favourites were these, from Fired Earth. Check out that price tag! £1000, yikes. I thought about more Morrocan style tiling, or ornate Victorian tiles, but couldn’t find anything I could afford.

“So how hard can it be to make my own?” I wondered. The answer, as it turns out, is “not as hard as you’d think”. As long as you can find a kiln, the materials are pretty inexpensive. You just need to find a design that is within your artistic ability, whatever that might be. Here’s how I did it.

I was fortunate enough to know an experienced ceramicist, Gill Palmer, so naturally sought her advice first. She pointed me in the right direction for tiles and other materials, and talked me through the process. Since I’d decided I just wanted flat tiles that I’d paint, I discovered there was no need to actually make my tiles from scratch, you can buy ready made “bisque” tiles at standard sizes.

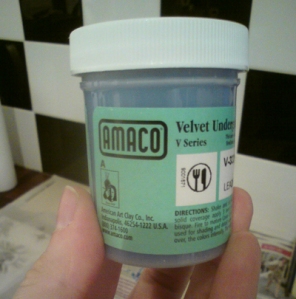
I bought mine from Cromartie, a pack of 44 tiles for about £20 plus postage. They were very good during the order process, but less friendly and helpful when I had a query later on I’m sorry to say. Ah well. I ordered the paints, Amaco Velvet Underglaze, from Bath Potter’s Supplies. No complaints there, they were very helpful. These paints are about £4 a pot. After 9 tiles I’m not even half through one pot of the paint I’m using for the design, and am nearly through a pot of white I’m using to cover the background. So still looking pretty cheap!

Amaco velvet underglaze paint in Teal Blue

Amaco velvet underglaze paint in Teal Blue

Note: you have to choose the colour of paints based on what colour it will *fire* to, rather than what it looks like out of the pot. Underglaze colours become more intense and darker once glazed and fired. You can see the comparison on the Bath Potter’s site.

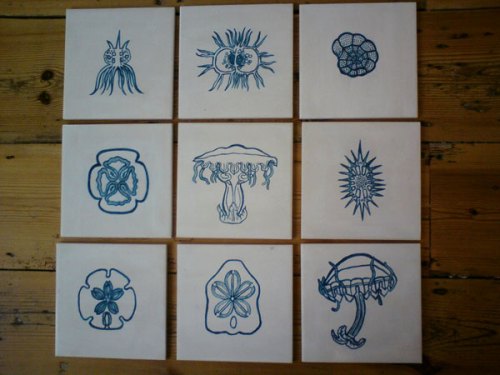
For the designs, I used the wonderful sea creature images of Ernst Haeckel, adapting images from his books on Natural Forms and Radiolarians into line drawings. His images are complex and often multicoloured, but I just traced over them, simplifying them in the process, and then copied those tracings.

I had decided to paint about 30 tiles, and then dot them around in between plain white gloss tiles (the sort you get in big packs from DIY stores fairly cheap). I painted the background with about 3 layers of white underglaze to match those gloss tiles and then painted on my copied designs with a much thinner paintbrush. I liked to keep the brush pretty heavy with paint rather than try and do any fine details as it flowed easier. Worked fine as long as I kept things fairly simple (my attempts at complicated octopi were a failure, for example). The amount of paint used affects how dark the final colour which is something to keep in mind.

Here are some of the unfired painted designs on Twitpic, notice how the blue changes in the later fired tiles:

another sand dollar and a, um, wiggly sea thing?... on TwitpicAnother  jellyfish and radiolarian... on TwitpicTwo from 1st batch of tiles reading for firing. Hopefully tak... on Twitpic

Once the first batch was done, I had to get them glazed and fired. There are a few places around that offer firing services, it’s worth checking with any local ceramicists. I originally found Jo Davies, who was very helpful and offered very reasonable prices for firing but lived just that bit too far away. Good for north London, not so much for me in the south. I then had a brainwave and called my local ceramics cafe, All Fired Up in East Dulwich, who were more than happy to help. They offer a firing service starting at only £4.50! They glazed them for me as well.

As an aside, I’d been before to All Fired Up to have coffee and paint their little dinosaurs and so on. I think it really helped to have a go before embarking on this tiling project; to get a sense of how the paint worked and how it looked after firing. I recommend trying this, even if you do go on to drop your hand painted polka dot mug and break it.

So, here is my first batch, fresh out of the kiln. Pretty pleased. You don’t seem to get a white that quite matches the even high-gloss white of shop-bought tiles, but I don’t think it will matter. Now I only have another 20 or so more to do…

First batch of fired tiles

First batch of fired tiles

Read Full Post »